
How to Plan and Install Outdoor Landscape Lighting
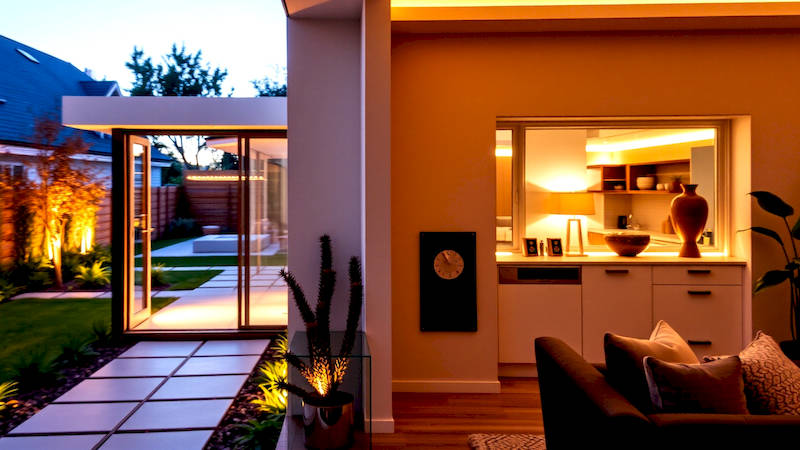
Outdoor landscape lighting has transcended its purely functional origins and evolved into a powerful design element, capable of dramatically enhancing a home’s curb appeal, increasing security, and extending the usability of outdoor living spaces. Gone are the days of a single, glaring floodlight. Today’s options range from subtle path lighting and dramatic uplighting to accentuating architectural features and creating inviting outdoor “rooms”. Properly planned and installed landscape lighting isn’t just about illumination; it’s about creating ambiance, fostering a sense of safety, and showcasing the beauty of your property.
Investing in landscape lighting has demonstrably positive returns. According to a study by the American Lighting Association, homes with well-designed outdoor lighting systems tend to sell faster and for a higher price than those without. Beyond financial benefits, a thoughtfully lit landscape increases the perceived security of a property, deterring potential intruders. More personally, it allows homeowners to enjoy their outdoor spaces long after sunset, expanding living areas and enriching evening enjoyment. Ultimately, effective landscape lighting is about enhancing lifestyle and increasing the value, security, and enjoyment of your home.
- Assessing Your Landscape and Defining Your Lighting Goals
- Understanding Lighting Techniques: Uplighting, Downlighting, and More
- Choosing the Right Fixtures: LED vs. Traditional Options
- Wiring and Installation: Low-Voltage vs. Line-Voltage Systems
- Practical Installation Steps: A Step-by-Step Guide
- Maintenance and Troubleshooting Your Landscape Lighting System
- Conclusion: Illuminating Your Outdoor Vision
Assessing Your Landscape and Defining Your Lighting Goals
Before purchasing a single fixture, a thorough assessment of your landscape is crucial. This initial planning phase sets the foundation for a successful and impactful lighting design. Consider the existing features you want to highlight – trees, shrubs, architectural details, water features, pathways, and patios. Equally important is understanding the overall style of your home and integrating the lighting scheme seamlessly with it. A modern home calls for different lighting techniques than a traditional colonial, and your lighting choices should reflect this.
Next, define your specific goals. Are you primarily focused on security, highlighting focal points, creating ambiance, or a combination of all three? Ranked priorities will guide your fixture choices and placement. For example, security lighting will necessitate brighter, more strategically positioned fixtures, while ambiance lighting will favor lower, softer illumination. Walk your property at night, noting dark areas and potential hazards, and visualize how lighting can address these concerns. Take photos and sketch out a rough layout to begin visualizing the possibilities.
Finally, consider the local environment. Is your property subject to significant weather conditions like heavy snow, high winds, or saltwater spray? Choose fixtures specifically designed to withstand these elements to ensure longevity and prevent premature failure. Analyzing soil type is also important if you plan on doing any direct burial wiring. This initial assessment isn’t simply about aesthetics; it’s about creating a functional, durable, and enduring lighting design.
Understanding Lighting Techniques: Uplighting, Downlighting, and More
Several core lighting techniques form the toolkit of any landscape lighting designer. Uplighting, as the name suggests, involves positioning fixtures at ground level to shine upwards onto trees, walls, or architectural features. This technique creates dramatic shadows and highlights textures, adding depth and dimension to the landscape. However, excessive uplighting can cause light pollution, so it’s important to use shielded fixtures to direct light downwards.
Downlighting accomplishes the opposite effect – fixtures are mounted above, often in trees or on structures, to cast light downwards. This mimics natural moonlight and is excellent for illuminating pathways, patios, and gathering areas. Downlighting is generally softer and less dramatic than uplighting, providing a more ambient glow. Path lighting is a specific type of downlighting, using low-level fixtures to guide foot traffic and improve safety. Selecting fixtures with a warm color temperature (around 2700K) is recommended for path lighting to create a welcoming atmosphere.
Beyond these basics, spotlighting utilizes focused beams to highlight specific elements, such as sculptures or fountains. Wash lighting spreads a broad, even glow across a surface, ideal for illuminating walls or large shrubs. Understanding these techniques and how they interact is key to creating a layered and dynamic lighting design. A professional lighting designer often employs a combination of these techniques to achieve the desired effect.
Choosing the Right Fixtures: LED vs. Traditional Options
The landscape lighting market has undergone a significant transformation in recent years, with LED (Light Emitting Diode) technology now dominating the field. While traditional halogen and incandescent fixtures were once the standard, LEDs offer substantial advantages in terms of energy efficiency, longevity, and cost-effectiveness. LEDs consume up to 80% less energy than incandescent bulbs and can last up to 25 times longer, translating to significant savings over the lifespan of the fixture.
When selecting LED fixtures, pay attention to several key specifications. Lumens measure the total amount of light emitted, while color temperature (measured in Kelvin) determines the warmth or coolness of the light. For landscape lighting, a warm white color temperature (2700K-3000K) is generally preferred, as it creates a more inviting and natural ambiance. Also consider the beam angle, which dictates how wide or narrow the light spread will be. Narrow beam angles are ideal for spotlighting, while wider angles are better for wash lighting.
Material is another critical factor. Look for fixtures made from durable materials like brass, copper, or stainless steel, which are resistant to corrosion and weathering. Avoid plastic fixtures, as they tend to become brittle and fade over time. While the initial cost of LED fixtures may be higher, the long-term benefits outweigh the expense. According to the Department of Energy, switching to LED lighting can save the average household hundreds of dollars per year.
Wiring and Installation: Low-Voltage vs. Line-Voltage Systems
Choosing between a low-voltage and line-voltage system represents the first major technical decision. Low-voltage systems operate at 12 volts, utilizing a transformer to step down the standard 120-volt household current. These systems are generally safer and easier to install, making them ideal for DIY projects. Low-voltage wiring can be buried relatively shallowly (typically 6-12 inches), and the low voltage minimizes the risk of electrical shock.
Line-voltage systems operate at 120 volts and require direct connection to the home's electrical panel. While offering more power and flexibility for larger properties, they necessitate a qualified electrician for installation and adhere to stricter safety regulations. Line-voltage systems also require deeper burial depths for the wiring, typically 18-24 inches.
Regardless of the system chosen, proper wiring techniques are essential. Use direct burial-rated landscape lighting cable and ensure all connections are watertight to prevent corrosion. When burying cable, avoid running it parallel to other utilities like gas lines or sprinkler systems. Always test the system with a multimeter before concealing any wiring. Compliance with local electrical codes is paramount; a permit may be required for electrical work.
Practical Installation Steps: A Step-by-Step Guide
Assuming a low-voltage system, the installation process generally follows these steps:
- Plan your cable runs: Map out the desired locations of your fixtures and plan the most efficient route for the low-voltage cable.
- Install the transformer: Choose a weather-protected location for the transformer and connect it to a GFCI-protected outlet.
- Bury the cable: Dig a shallow trench (6-12 inches) and lay the cable, protecting it with conduit if necessary.
- Connect the fixtures: Connect the fixtures to the cable using waterproof connectors.
- Adjust and aim the lights: Once all fixtures are connected, power up the system and adjust the angles and intensity of each light to achieve the desired effect.
- Backfill the trenches: Carefully backfill the trenches, ensuring the cable is fully protected.
It’s crucial to consult the manufacturer's instructions for specific installation procedures. Consider using a cable locator to avoid accidental damage during future landscaping projects.
Maintenance and Troubleshooting Your Landscape Lighting System
Even after installation, regular maintenance is crucial to ensure your landscape lighting system continues to function optimally. Periodically inspect the fixtures for damage, corrosion, or debris buildup. Clean the lenses with a mild soap and water solution to maintain brightness. Check all connections for corrosion and tighten as necessary.
Troubleshooting common issues can often be addressed with a systematic approach. If a light isn’t working, check the bulb (LED replacements are readily available) and the wiring connections. If multiple lights are out, inspect the transformer for proper operation. A blown fuse or tripped circuit breaker could also be the culprit.
Winterizing your system is essential in colder climates. Disconnect the transformer and store it indoors to protect it from freezing temperatures. Detach and store the fixtures to prevent damage from snow and ice. Regularly testing the entire system is crucial for catching issues before they escalate into larger problems.
Conclusion: Illuminating Your Outdoor Vision
Planning and installing outdoor landscape lighting is an investment that yields significant rewards, boosting curb appeal, enhancing security, and expanding the usability of your outdoor spaces. By thoroughly assessing your landscape, understanding the different lighting techniques, selecting the right fixtures, and following proper installation procedures, you can create a captivating and functional lighting design that reflects your personal style and enhances your lifestyle. Remember to prioritize safety, adhere to local electrical codes, and perform regular maintenance to ensure enduring performance. Don't be afraid to start small, focusing on a few key areas, and gradually expand your system over time. The key takeaway is that thoughtful planning and quality execution are the cornerstones of successful landscape lighting. The next step? Sketch out your vision, research your options, and begin transforming your outdoor space into a beautifully illuminated haven.
Deja una respuesta