
How to Install a Freestanding Tub in a Small Bathroom Space
The bathroom, once a purely functional space, has evolved into a personal sanctuary. And at the heart of many dream bathrooms lies the freestanding tub—a statement piece that evokes images of relaxation and spa-like tranquility. However, the perception that freestanding tubs are only suitable for large bathrooms is a common misconception. With careful planning, clever design choices, and a solid understanding of the installation process, you can successfully integrate a freestanding tub into a smaller bathroom space, transforming it into a luxurious and inviting retreat. This article will provide a comprehensive guide to achieving just that, covering everything from preliminary considerations to final touches, ensuring a seamless and rewarding bathroom renovation.
The desire for freestanding tubs is demonstrably growing. According to a recent report by Freedonia Group, the US bathroom remodeling market is projected to reach $83.4 billion by 2027, with an increasing portion dedicated to luxury upgrades like freestanding tubs. This trend reflects a shift in homeowner priorities towards creating personalized, spa-like experiences within their homes. But tackling this project in a limited space presents unique challenges that require specific attention. It’s not simply about squeezing a larger fixture into a smaller room; it’s about thoughtfully re-imagining the space to maximize both function and aesthetics.
Successfully navigating a freestanding tub installation in a small bathroom requires more than just DIY enthusiasm; it demands meticulous planning and an objective assessment of your plumbing, floor support, and overall bathroom layout. Ignoring these initial steps can lead to costly mistakes and a bathroom that doesn’t live up to your vision. This guide will outline each stage of the process, from selecting the right tub to ensuring a watertight and structurally sound installation, enabling you to confidently transform your small bathroom into a luxurious haven.
- Assessing Your Bathroom’s Feasibility and Choosing the Right Tub
- Plumbing Considerations & Necessary Modifications
- Preparing the Subfloor and Creating a Solid Base
- The Installation Process: Step-by-Step Guide
- Finishing Touches & Maximizing Space with Design
- Conclusion: Transform Your Small Bathroom into a Spa-Like Retreat
Assessing Your Bathroom’s Feasibility and Choosing the Right Tub
Before you even begin browsing tub styles, a thorough assessment of your bathroom's infrastructure is crucial. This isn't simply a matter of measuring available space; it involves a detailed examination of the existing plumbing, floor joists, and overall bathroom layout. Locating the drain is paramount. Freestanding tubs require a floor drain relatively close to the intended tub placement. Moving plumbing is significantly more complex and expensive than working with the existing configuration. Consider the accessibility for cleaning and maintenance points as well.
A key factor often overlooked is the floor support. Freestanding tubs, filled with water and a person, are heavy. You'll need to verify that your floor joists can handle the substantial concentrated weight. Consult a structural engineer if you have any doubts, especially if you have a bathroom located above a living space. Ignoring this step could result in a dangerous and costly structural failure. Furthermore, the space surrounding the tub needs consideration. Allow at least 24-30 inches of clear walking space around the tub for comfortable access and maneuverability. This impacts the placement of other fixtures like the toilet and vanity.
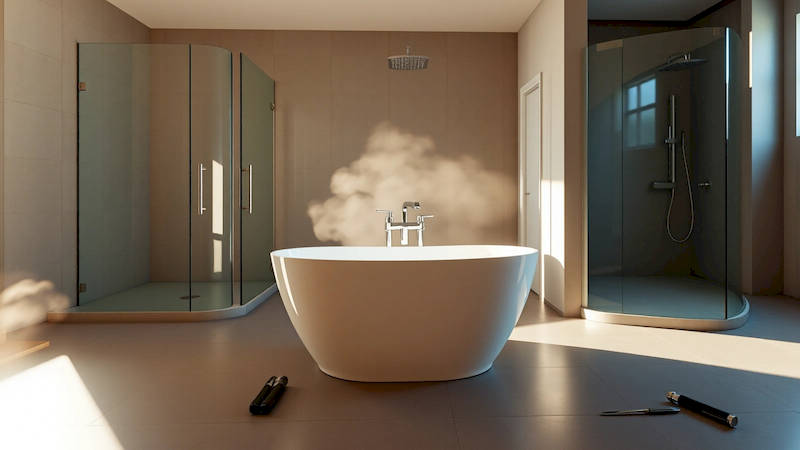
Choosing the right tub is equally important. In small bathrooms, space-saving designs are key. Opting for a smaller, more compact tub with a streamlined shape can make a significant difference. Consider a Japanese soaking tub (Ofuro), known for its deeper shape and smaller footprint. Corner tubs, while not strictly 'freestanding' in the traditional sense, can also maximize space utilization. Material choice is important too. Acrylic tubs are lightweight and retain heat well, while cast iron tubs are incredibly durable but considerably heavier.
Plumbing Considerations & Necessary Modifications
One of the most challenging aspects of installing a freestanding tub is the plumbing. Unlike traditional alcove tubs, freestanding tubs expose the drain and overflow, requiring careful planning and potentially extensive modifications to your existing plumbing system. You will need access to both hot and cold water supplies as well as a drain connection for the tub. This often necessitates running pipes beneath the floor, which might involve cutting into the subfloor and rerouting existing lines.
Before starting any plumbing work, it's vital to shut off the water supply to the entire bathroom. Next, carefully inspect the existing drain piping. You’ll likely need a P-trap specifically designed for freestanding tubs, ensuring proper drainage and preventing sewer gases from entering the bathroom. The tub drain connection itself is typically 1 ¾ inches in diameter and requires a compatible drain assembly. Consider a pop-up drain with remote operation for ease of use and a cleaner aesthetic. Installing a floor-mounted tub filler is the most common approach, providing a luxurious waterfall effect and ease of access. However, wall-mounted options are also available, offering a more minimalist look.
A crucial, and often overlooked, aspect is waterproofing. The area around the drain and any exposed plumbing connections must be thoroughly waterproofed to prevent leaks and water damage. Use a high-quality waterproof membrane and sealant, paying close attention to seams and corners. Remember, even a small leak can lead to significant structural problems over time. Hiring a licensed plumber is strongly recommended for this stage to ensure compliance with local plumbing codes and prevent costly mistakes.
Preparing the Subfloor and Creating a Solid Base
A stable and level subfloor is absolutely essential for a successful freestanding tub installation. Because freestanding tubs rely on their own weight for stability, any irregularities in the subfloor can compromise their balance and potentially cause cracking or even collapse. Before installing the tub, meticulously inspect the subfloor for any signs of damage, rot, or weakness.
If you identify any issues, repairs must be made before proceeding. This might involve replacing damaged sections of plywood or reinforcing the floor joists. Once the subfloor is sound, it needs to be leveled. Use a self-leveling compound to create a perfectly even surface for the tub to rest on. This is particularly important if your bathroom floor is slightly sloped or uneven. After the leveling compound has dried completely, you may need to add a layer of plywood sheeting to provide additional support and a smoother surface.
Some installations may benefit from creating a dedicated base for the tub. This involves constructing a small platform using wood framing, which provides extra support and allows for easier access to the plumbing connections. The platform should be perfectly level and securely attached to the floor joists. Regardless of whether you build a platform or not, ensure the entire area is thoroughly sealed with a waterproof membrane to prevent moisture damage.
The Installation Process: Step-by-Step Guide
With the plumbing and subfloor prepared, the actual installation of the tub can begin. This process demands precision and attention to detail. First, carefully maneuver the tub into its designated location. This may require assistance, as many tubs are heavy and awkward to handle. Avoid dragging the tub across the floor, as this could damage the finish. Place the tub on a protective layer of cardboard or a drop cloth to prevent scratches.
Next, connect the drain assembly to the tub drain opening, ensuring a tight and watertight seal. Use plumber’s putty or silicone sealant to prevent leaks. Then, carefully connect the drainpipe to the existing plumbing system, making sure all connections are secure and properly aligned. Once the plumbing is connected, it's time to install the tub filler. Follow the manufacturer's instructions for installation, ensuring that the filler is level and securely mounted to the floor or wall.
Finally, carefully test the installation for leaks. Turn on the water supply and allow the tub to fill up, inspecting all connections for any signs of dripping or seepage. If you detect any leaks, immediately shut off the water supply and address the issue. Once you're confident that the installation is leak-free, you can proceed with finishing touches like caulking around the tub and installing any decorative trim.
Finishing Touches & Maximizing Space with Design
The installation isn’t complete until you’ve addressed the finishing touches that enhance both functionality and aesthetics. Caulking around the base of the tub is crucial to prevent water from seeping beneath the tub and causing damage. Choose a high-quality, mildew-resistant caulk that matches the color of your bathroom. Consider the surrounding elements. Because of the exposed plumbing and larger footprint of the tub, you might need to make aesthetic changes to the surrounding elements.
Maximizing space in a small bathroom requires strategic design choices. Utilize vertical space with shelving or wall-mounted storage units. Mirror placement is critical; a large mirror can create the illusion of a larger space. Opt for light, bright colors to make the room feel more open and airy. Compact vanities and wall-mounted faucets can save valuable floor space. As an example, consider a case study of a 5x8 bathroom renovated to include a compact acrylic freestanding tub. The homeowners opted for a corner placement, creating space for a slim vanity and a wall-mounted toilet, transforming the cramped space into a functional and luxurious retreat. “The key was to prioritize what was most important – the soaking tub – and then design around it, focusing on maximizing every inch of available space," states interior designer Sarah Miller.
Conclusion: Transform Your Small Bathroom into a Spa-Like Retreat
Installing a freestanding tub in a small bathroom is undoubtedly a challenging undertaking, but the rewards—a luxurious and relaxing bathing experience—are well worth the effort. By meticulously assessing your bathroom's feasibility, choosing the right tub, and carefully executing each stage of the installation process, you can successfully transform your small bathroom into a spa-like haven. Remember the importance of structural integrity, proper plumbing, and watertight seals.
The key takeaways include: thorough pre-assessment of plumbing and floor support; careful selection of a space-saving tub design; expert plumbing modifications when necessary; commitment to a stable and level subfloor; and attention to detail during the installation process. Don't hesitate to consult with professionals—plumbers, structural engineers, and interior designers—to ensure a safe, compliant, and aesthetically pleasing result. By embracing careful planning and informed decision-making, you can prove that luxury isn’t limited by square footage and create a bathroom that is both functional and exquisitely beautiful.
Deja una respuesta