
DIY Attic Kids’ Playroom Ideas for Small Spaces
The attic – often a repository for forgotten memories and holiday decorations – represents a wealth of untapped potential within the home. While traditionally considered storage space, attics are increasingly being reimagined as functional living areas, and topping the list of popular transformations is the kids’ playroom. This isn't just about decluttering; it's about creating a dedicated haven for imagination, creativity, and free play, away from the bustle of the main living areas. For families in homes with limited square footage, the attic offers a unique opportunity to expand their living space without expanding their footprint.
However, converting an attic into a playroom isn’t as simple as clearing out the boxes. It requires careful planning, a focus on safety, and a creative approach to maximizing limited space. The sloping ceilings, awkward angles, and often-limited natural light present specific challenges. This article serves as a comprehensive guide to transforming your attic into a vibrant and functional playroom, specifically tailored for smaller spaces, offering practical tips, design ideas, and essential considerations to make your vision a reality. We will focus on DIY approaches to keep the conversion affordable and manageable for the average homeowner.
The joy of a dedicated playroom extends far beyond simply giving the kids a designated area for toys. A well-designed playroom can foster independence, encourage imaginative play, and even contribute to improved organization throughout the rest of the house. A designated play area reduces toy clutter in common spaces and provides a safe, controlled environment where children can explore and learn.
- Assessing Your Attic’s Potential & Addressing Safety Concerns
- Maximizing Space with Clever Storage Solutions
- Optimizing Light and Creating a Welcoming Atmosphere
- Embracing Multifunctional Furniture and DIY Projects
- Design Themes & Personalized Touches
- Flooring Considerations: Comfort, Safety, and Durability
- Conclusion: From Forgotten Space to Family Fun
Assessing Your Attic’s Potential & Addressing Safety Concerns
Before diving into décor and design, a thorough assessment of your attic’s structural integrity and safety features is crucial. Not all attics are suitable for conversion. Check for adequate headroom – ideally, at least 7 feet in the center of the room. Low-sloping roofs can restrict space, so carefully measure and plan around them. Beyond headroom, examine the flooring. Attics are often only supported for storage loads, not the dynamic weight of children playing. Reinforcing the floor joists may be necessary, requiring consultation with a structural engineer, particularly for heavier play setups.
Ventilation is another key consideration. Attics can get extremely hot in the summer and cold in the winter. Proper insulation and ventilation are vital for temperature regulation and preventing moisture build-up which can lead to mold growth. Adding vents or an attic fan can significantly improve air circulation. Furthermore, electricity is essential for lighting, outlets for toys and electronics, and potentially a small heating or cooling unit. If your attic lacks existing electrical wiring, you'll need to hire a qualified electrician to run new circuits safely. DIY electrical work is almost universally a bad idea.
Finally – and most importantly – prioritize safety. This includes adding a sturdy handrail to the attic stairs, ensuring windows are secure and childproofed, and properly insulating any exposed beams to prevent bumps and bruises. Consider the placement of light fixtures; avoid low-hanging lights that children could accidentally hit. A smoke detector is also essential. Before beginning any conversion work, check your local building codes and permit requirements.
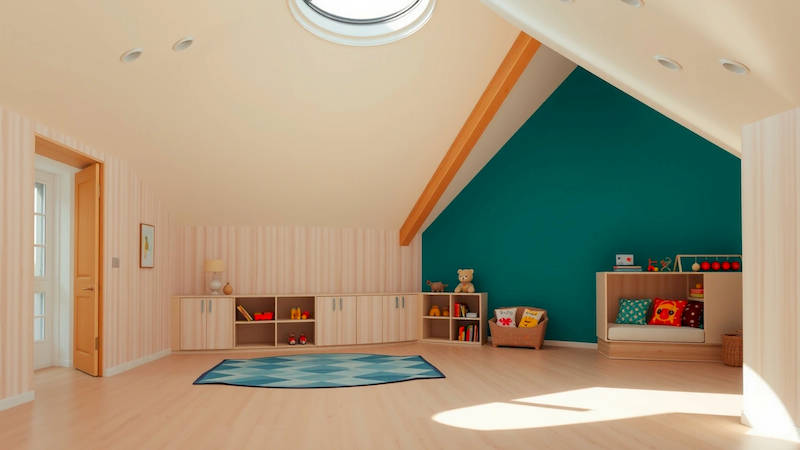
Maximizing Space with Clever Storage Solutions
Small attic playrooms demand creative storage solutions. Standard furniture often won’t fit comfortably under sloping ceilings or in tight corners. Embracing built-in storage is often the most effective approach. Consider low, wide shelving units that run along the walls, maximizing vertical space without obstructing headroom. These can be constructed relatively easily with plywood and brackets, painted or covered in fun fabric to blend with the playroom’s décor. Utilize the eaves – the space under the sloping roof – for storage cubbies or bookshelves.
Another space-saving trick is to incorporate storage into the playroom’s features. A window seat with lift-up storage underneath provides both seating and concealed storage for toys. Similarly, a platform or raised floor area can create hidden storage space beneath it. Think vertically – tall, narrow bookcases are ideal for displaying books and toys without taking up too much floor space. Woven baskets and fabric bins are excellent for organizing smaller items and can be easily moved around. Labelling bins and shelves will encourage children to participate in tidying up.
A vital aspect of effective storage is regular decluttering. Implement a system for regularly sorting through toys and donating or discarding those that are no longer used. This not only creates more space but also teaches children the importance of letting go and sharing.
Optimizing Light and Creating a Welcoming Atmosphere
Attics often suffer from limited natural light, potentially making the space feel dark and cramped. Prioritizing light – both natural and artificial – is crucial to creating a cheerful and inviting playroom. If possible, consider adding a skylight or dormer window to significantly increase natural light. Even a small window can make a big difference. If structural changes are not feasible, maximize the light from existing windows by trimming overgrown shrubs or trees outside.
For artificial lighting, avoid relying solely on a single overhead fixture. Layering light creates a more welcoming and functional atmosphere. Use a combination of ambient lighting (overhead fixtures), task lighting (lamps for reading or building), and accent lighting (string lights or fairy lights for a whimsical touch). Opt for warm-toned light bulbs to create a cozy and inviting atmosphere. Mirrors strategically placed can also reflect light, making the space feel brighter and more open.
Beyond lighting, color plays a significant role in creating a welcoming atmosphere. Opt for light, bright colors that reflect light and make the space feel larger. Accent walls in cheerful colors can add personality without overwhelming the space. Incorporate playful patterns and textures through rugs, curtains, and artwork.
Embracing Multifunctional Furniture and DIY Projects
Given the limited space in most attic playrooms, multifunctional furniture is a game-changer. A daybed can serve as a comfortable lounging area during playtime and a guest bed for sleepovers. A folding table can be easily stored away when not in use, providing a surface for arts and crafts or games. Consider furniture that can grow with your child, such as a desk that can be adjusted in height.
DIY projects can add a personal touch to your attic playroom and save money. Building a small climbing structure or fort from reclaimed wood can provide hours of entertainment. Creating a chalkboard wall allows for creative expression and is easily washable. Repurposing old furniture – such as painting a dresser or bookshelf – can give it a new lease on life. Involve your children in the DIY process; it's a fun bonding experience and fosters creativity. Making simple cushions or artwork together adds a personalized touch.
Remember, the key is to be resourceful and think outside the box. Utilize every inch of available space and prioritize furniture that serves multiple purposes.
Design Themes & Personalized Touches
Choosing a cohesive design theme can tie the entire playroom together. Popular themes for attic playrooms include whimsical forests, adventurous spaceships, enchanted castles, or vibrant art studios. The theme doesn't have to be elaborate; even a simple color scheme and a few key accessories can create a unified look. Consider your child's interests and passions when selecting a theme.
Personalized touches add character and make the playroom truly special. Display your child’s artwork, photos, and handmade creations. Create a reading nook with comfy cushions and a favorite collection of books. Incorporate elements that reflect your family’s values and hobbies. A map of places you’ve traveled, a collection of seashells from a beach vacation, or a display of family heirlooms can add a personal touch.
Ultimately, the goal is to create a space that reflects your child’s personality and fosters their creativity and imagination. Don’t be afraid to experiment with different ideas and let your child’s preferences guide your design choices.
Flooring Considerations: Comfort, Safety, and Durability
The type of flooring you choose for your attic playroom is crucial for both comfort and safety. Hardwood floors can be aesthetically pleasing, but they can also be cold and unforgiving. Carpet provides a softer surface for play, but it can also be more difficult to clean and may trap allergens. A compromise could be area rugs over a durable, easy to clean base floor.
Consider the type of play that will take place in the playroom. If your child enjoys building forts or engaging in active play, a resilient flooring option is essential. Foam tiles are a popular choice for playrooms, providing a soft, cushioned surface that is also easy to clean. Rubber flooring is another durable option that is resistant to wear and tear. Vinyl flooring is a budget-friendly option that is available in a wide range of colors and patterns.
Prioritize safety when selecting flooring. Ensure the flooring is slip-resistant and does not pose a tripping hazard. Avoid flooring options with sharp edges or protruding pieces. If you choose to install new flooring, ensure it is properly secured to the subfloor to prevent movement.
Conclusion: From Forgotten Space to Family Fun
Transforming an attic into a DIY kids’ playroom is a rewarding project that can add significant value to your home and create a cherished space for your family. It requires careful planning, attention to detail, and a willingness to get creative with limited space. By prioritizing safety, maximizing storage, optimizing light, and embracing multifunctional furniture, you can turn a forgotten attic into a vibrant and functional playroom that inspires imagination and encourages play.
The key takeaways from this guide are: thoroughly assess the attic's structural integrity and safety before starting; focus on maximizing space through clever storage solutions; prioritize light and create a welcoming atmosphere; embrace DIY projects and personalized touches; and carefully consider flooring options for comfort, safety, and durability. Don't be afraid to start small and build upon your vision over time. With a little effort and creativity, you can create an attic playroom that your kids will love for years to come. The first step is to measure your space, create a detailed plan, and gather your materials. Remember to check building codes and prioritize safety throughout the entire process.
Deja una respuesta