
Step-by-Step Guide to Building a DIY Closet Organizer on a Budget
The dreaded closet. For many, it’s a black hole of forgotten purchases, ill-fitting clothes, and a general sense of overwhelm. A disorganized closet isn’t just aesthetically displeasing; it can genuinely impact your daily life, adding stress to your mornings as you frantically search for that one specific item. But achieving a beautifully organized closet doesn’t require a professional designer or a hefty price tag. In fact, with a little planning, some elbow grease, and a commitment to decluttering, you can build a functional and stylish DIY closet organizer that perfectly suits your needs and your budget.
The key to successful closet organization lies in maximizing vertical space and tailoring the solution to your wardrobe, rather than trying to force your clothes into a pre-fabricated system. According to a recent study by the National Association of Home Organizers, the average American spends upwards of 8 minutes per day looking for misplaced items, a significant chunk of wasted time that could be reclaimed with a more efficient storage system. This guide will walk you through each step, from initial assessment to final touches, empowering you to transform your closet from chaos to calm. We’ll focus on affordable materials and resourceful techniques, proving that dream closet organization is attainable for everyone.
- Assessing Your Needs and Closet Space
- Planning Your Design and Material Selection
- Building the Basic Framework: Hanging Rods and Shelving
- Maximizing Space with Accessories and Organizers
- Finishing Touches and Maintaining Organization
- Beyond the Basics: Additional Budget-Friendly Ideas
- Conclusion: Reclaim Your Space, Reclaim Your Time
Assessing Your Needs and Closet Space
Before you even think about purchasing materials, a thorough assessment of your current closet space and wardrobe is essential. This initial phase is arguably the most important, as it forms the foundation for a truly functional system. Start by completely emptying the closet. This allows you to see the raw space and forces you to handle every item, prompting crucial decluttering decisions. Don't just look at your clothes; analyze them.
Once empty, measure the interior dimensions of your closet – height, width, and depth. Pay attention to any awkward angles or obstructions like pipes or ventilation. Simultaneously, evaluate your existing wardrobe. Categorize your clothing (shirts, pants, dresses, etc.) and consider the ratio of hanging items versus folded items. Do you have a large shoe collection? Lots of accessories? This inventory will dictate the types of storage solutions you’ll need, like extra shelving for sweaters, a dedicated shoe rack, or more hanging rods. Finally, analyze your habits. Are you a visual person who needs to see everything at a glance, or are you comfortable with closed storage? This understanding will shape your design choices.
Don't underestimate the power of a brutally honest declutter. The KonMari method, popularized by Marie Kondo, encourages you to only keep items that "spark joy.” While this approach isn’t for everyone, the underlying principle – getting rid of unnecessary items – is crucial. Donate, sell, or responsibly dispose of anything you haven’t worn in a year, that doesn’t fit, or that you no longer love. A leaner wardrobe requires less storage space and makes organization significantly easier.
Planning Your Design and Material Selection
With a clear understanding of your needs and space, you can start designing your DIY closet organizer. Sketch out a plan, even if it’s just a rough drawing. Consider different configurations based on your closet’s layout and your wardrobe analysis. Think about maximizing vertical space with multiple tiers of hanging rods and shelving. Explore ideas like adding a second rod below the existing one to double your hanging capacity. Shelving is ideal for folded items, shoes, and accessories. Consider adjustable shelving for flexibility as your needs evolve.
Budget-friendly materials are key. Avoid expensive custom closet systems. Instead, opt for readily available and affordable options like melamine boards, plywood, or even repurposed materials like bookshelves or dressers. Melamine is a cost-effective choice for shelving and creates a clean look. Plywood offers more stability and can be painted or stained to match your existing décor. Look for materials at local hardware stores, lumberyards, or even online marketplaces. When estimating costs, don't forget to include hardware like screws, brackets, and shelving supports.
Don’t overlook the potential of repurposed items. Old bookshelves can be transformed into freestanding closet storage units. Dressers can be incorporated to provide additional drawer space. Think creatively and look for opportunities to upcycle existing furniture. This not only saves money but also adds a unique touch to your closet. Remember to always prioritize safety and ensure any repurposed furniture is securely anchored to the wall to prevent tipping.
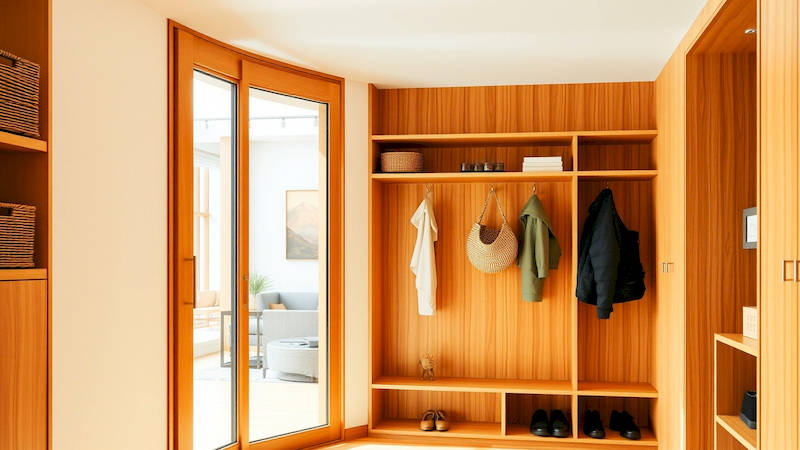
Building the Basic Framework: Hanging Rods and Shelving
The foundation of most closet organizers is a combination of hanging rods and shelving. Installing these elements properly is crucial for stability and functionality. Begin by marking the desired locations for your hanging rods and shelving on the closet walls. Use a level to ensure everything is straight. Then, attach brackets or supports to the walls using screws. Choose brackets that are appropriate for the weight you’ll be supporting. For heavier items, use heavier-duty brackets.
For hanging rods, you can use metal closet rods or wooden dowels. Metal rods are more durable and can support heavier loads, while wooden dowels offer a more rustic aesthetic. Secure the rods to the brackets using screws or flanges. Ensure the rods are firmly attached and can support the weight of your clothes without sagging. Consider adding a center support bracket for longer rods to prevent bending.
When installing shelving, carefully measure and cut the melamine boards or plywood to the desired dimensions. Attach shelving supports to the walls, ensuring they are level and securely fastened. Rest the shelving boards on the supports and secure them with screws. If you’re using adjustable shelving, install shelf standards with pre-drilled holes and use shelf pins to support the shelves at different heights. Prioritize sturdy construction to prevent shelves from collapsing under the weight of your belongings.
Maximizing Space with Accessories and Organizers
Once the basic framework is in place, it’s time to add accessories and organizers to maximize space and enhance functionality. Consider utilizing the often-overlooked door space with an over-the-door organizer for shoes, accessories, or cleaning supplies. Hanging shoe organizers are particularly effective for small closets. Drawer dividers are essential for keeping folded clothes neat and organized. Separating items by type (socks, underwear, t-shirts) makes it easier to find what you’re looking for.
Baskets and bins are your best friends when it comes to organizing small items like scarves, belts, and hats. Choose baskets and bins that are appropriately sized for your items and that fit within your closet's dimensions. Labeling the baskets and bins makes it easy to identify the contents at a glance. Utilizing clear bins also helps with easy identification without having to open it. Don't forget about vertical space within the closet. Stackable shelves or drawer units can further maximize storage capacity.
Consider adding a valet rod – a small, removable rod that you can pull out to hang outfits you're planning to wear. This can help streamline your morning routine. Install hooks on the walls for hanging bags, belts, or robes. Finally, don’t underestimate the power of good lighting. A well-lit closet makes it easier to see your clothes and accessories, and adds a touch of luxury.
Finishing Touches and Maintaining Organization
Now comes the fun part: putting everything back in its place! Organize your clothes by category and color, making it easier to find what you’re looking for. Hang frequently worn items in easily accessible locations and store seasonal items higher up or in less accessible areas. Pay attention to visual appeal. A neatly organized closet is more enjoyable to use. Fold clothes consistently and hang items neatly.
Maintaining organization is an ongoing process. Schedule regular decluttering sessions (at least twice a year) to remove items you no longer need or use. Put clothes away immediately after wearing them, and avoid letting laundry pile up. Re-evaluate your system periodically and make adjustments as needed. "A place for everything and everything in its place" is a good mantra to adopt.
According to organizing expert Peter Walsh, author of "It's All About Showing Up", “Organization is not about having everything perfect, it's about creating a space that supports your life.” Don’t strive for unattainable perfection; focus on creating a system that works for you and makes your life easier.
Beyond the Basics: Additional Budget-Friendly Ideas
If you're feeling ambitious, there are several other budget-friendly ways to enhance your DIY closet organizer. Consider adding a pull-out laundry hamper to save space and keep dirty clothes contained. Create a jewelry organizer using repurposed picture frames and chicken wire. Build a tie rack or belt rack using simple hooks attached to a wooden board. These small additions can make a big difference in the overall functionality and aesthetic appeal of your closet.
Repainting the closet interior can also brighten up the space and create a more inviting atmosphere. Choose a light, neutral color to make the closet feel larger. Add decorative touches like artwork or patterned wallpaper to personalize the space. Remember, a well-organized closet isn't just about functionality; it's also about creating a space that you enjoy being in.
Conclusion: Reclaim Your Space, Reclaim Your Time
Building a DIY closet organizer on a budget is a worthwhile investment in your time, sanity, and overall well-being. By following these steps – from assessing your needs and planning your design to building the framework and adding finishing touches – you can transform a chaotic closet into a functional and stylish storage space. Remember that the key is to tailor the system to your needs and preferences, utilizing affordable materials and resourceful techniques.
The benefits extend beyond a tidier wardrobe. An organized closet reduces stress, saves time, and allows you to see and appreciate everything you own. A decluttered space contributes to a decluttered mind. As a final takeaway, don't be afraid to experiment and adjust your system as needed. The perfect closet organizer isn’t a destination, but an ongoing process of refinement and adaptation. So, roll up your sleeves, get organized, and enjoy the rewarding feeling of reclaiming your space and reclaiming your time.
Deja una respuesta